Kubernetes Cluster — Selenium Grid Disposable Pods

Introduction
Kubernetes is a powerful open-source system for managing containerized applications in a clustered environment. It collaborates local & virtual machines across clusters using a shared network for communication.
It also aims to provide a platform for automating deployment, scaling, and operations of application containers across clusters of hosts.
Kubernetes — Master & Worker Components is a master-slave type of architecture where certain components are master components in the cluster while others are slave components that execute application workloads (containers) as decided by the master components. A common expectation from the Kubernetes cluster is to accommodate increasing workloads and to be fault-tolerant with its self-healing capacity during an outage. It keeps track of its nodes as it gives Kubernetes more freedom in rescheduling pods from failed nodes onto new nodes.
Why Kubernetes For UI Automation Testing?
K8s gives us a powerful option of Disposable-Pods where before execution we create Selenium-Grid with browser-specific pods & later delete them when execution is completed. This helps in reducing the load on VM’s & managing resources effectively.
This also scrapped need of multiple windows VM’s to share the load of UI Regressions. Managing multiple VM’s was painful & time-consuming. K8s clusters, browser-specific pods replaced multiple windows VM’s with advanced Disposable-Pods.
Pre-Requisites ->
* Ubuntu VM  >>  (CPU=10 , RAM=16 GB, HDD=80GB)
* Docker On Ubuntu
* Kubernetes On Ubuntu
* Jenkins Server
* Grafana Monitoring Tool
Spinning Pods (Selenium Hub & Chrome Node)->
Here is the deployment Kube.yaml file which will deploy Selenium Hub Pod along with multiple Chrome Node Replicas creating service as a load balancer for balancing the traffic coming from all the registered chrome nodes Replicas.
# Author-> Rajpratap Singh
apiVersion: apps/v1
kind: Deployment
metadata:
  name: selenium-hub
  labels:
    app: selenium-hub
spec:
  replicas: 1
  selector:
    matchLabels:
      app: selenium-hub
  template:
    metadata:
      labels:
        app: selenium-hub
    spec:
      containers:
      - name: selenium-hub
        image: selenium/hub:3.141.59-20200525
        ports:
          - containerPort: 4444
        resources:
          limits:
            memory: "1000Mi"
            cpu: ".5"
        livenessProbe:
          httpGet:
            path: /wd/hub/status
            port: 4444
          initialDelaySeconds: 30
          timeoutSeconds: 5
        readinessProbe:
          httpGet:
            path: /wd/hub/status
            port: 4444
          initialDelaySeconds: 30
          timeoutSeconds: 5
---
apiVersion: apps/v1
kind: Deployment
metadata:
  name: selenium-node-chrome
  labels:
    app: selenium-node-chrome
spec:
  replicas: 1
  selector:
    matchLabels:
      app: selenium-node-chrome
  template:
    metadata:
      labels:
        app: selenium-node-chrome
    spec:
      volumes:
        - name: shm
          hostPath:
            path: /dev/shm
            type: Directory
        - name: download
          hostPath:
            path: /path/to/Download
            type: Directory
        - name: upload
          hostPath:
            path: /path/to/Upload
            type: Directory
      containers:
      - name: selenium-node-chrome
        image: selenium/node-chrome-debug:3.141.59-20200525
        securityContext:
          allowPrivilegeEscalation: false
          runAsUser: 0
        ports:
          - containerPort: 5555
        volumeMounts:
          - mountPath: /dev/shm
            name: shm
          - mountPath: /path/to/Download
            name: download
          - mountPath: /path/to/Upload
            name: upload
        env:
          - name: HUB_HOST
            value: "selenium-hub"
          - name: HUB_PORT
            value: "4444"
          - name: NODE_MAX_SESSION
            value: "2"
          - name: NODE_MAX_INSTANCES
            value: "2"
          - name: DBUS_SESSION_BUS_ADDRESS
            value: "/dev/null"
        resources:
          limits:
            memory: "2000Mi"
            cpu: "1"
---
apiVersion: v1
kind: Service
metadata:
  name: selenium-hub
  labels:
    app: selenium-hub
spec:
  ports:
  - port: 4444
    targetPort: 4444
    nodePort: 30001
    name: port0
  selector:
    app: selenium-hub
  type: LoadBalancer
  sessionAffinity: None
Apply the Kube.YAML file to the K8s cluster & verify pods created.
$ kubectl create -f Kube.yaml
$ kubectl get po
After deploying Kube.yaml, we can validate all the new Pods created.
Expose Selenium Hub->
Selenium Hub is already exposed to the outside world in Kube.yaml under nodePort: 30001
Navigate To-> http://X.X.X.X:30001/grid/console , Where X.X.X.X is IP Adress of Remote Ubuntu VM.
We can verify here that we created 7 Chrome Pods here with the latest Chrome Version-> 83.0.4103.61 & each pod carries 2 Chrome Instances. This way we can launch 14 Chrome Instances in single short which further executes 14 UI Test cases parallelly. We can modify this configuration based on our need & use Chrome & Firefox parallelly.
Disposing Pods After Execution Completed->
$ kubectl delete --all deployments,services,pods
Here we can see that we removed all pods after our execution is completed. This way we can reduce the load on VM & control resources based on our needs.
Grafana Monitoring Kubernetes Cluster->
$ kubectl port-forward --address X.X.X.X -n monitor prometheus-prometheus-operator-prometheus-0 9090
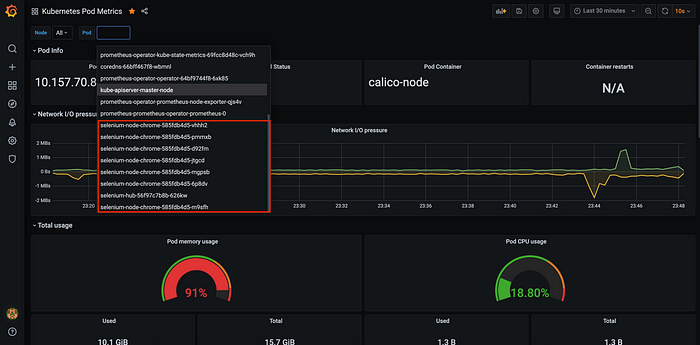
Grafana is a monitoring tool for the K8s Cluster, where we can monitor & analyze the CPU & Memory Usage. We can also monitor Pod's performance from Grafana Dashboard. To use Grafana with K8s we need to install Prometheus within K8s cluster & then port-forward it to a specific port. Prometheus will gather all info from the K8s cluster & make it visible on Grafana Dashboard.
Jenkins Cron Job For UI Regressions->
When we need to run UI Regressions on daily basis then complete above setup is painful if need to perform manually. So under Jenkins Cron-Job, we’ll automate all steps & schedule Jenkins's job to build it Periodically On Daily Basis.
Jenkins Plugins Required->
* Robot Framework Plugin
* Kubernetes CLI PluginSteps To Configure Jenkins Job->
* Integrate Git Repo Which Carries Source Code in Ubuntu VM.
* Build periodically -> 01 4 * * *  (4:01:26 AM India Standard Time)
* Upload Kube Config File under Kubernetes CLI Plugin
* I use Robot Framework, so Configure it accordingly.
* Set Email Notification Alert on Failures

With multiple pods & chrome instances, I complete my UI Regression in 28 Min. To reduce storage needs & avoiding the management of multiple Windows VM, we should migrate to cloud technologies which are widely appreciated & accepted now & in the coming future.
Advantages For K8s-Selenium Grid->
* Complete Setup is automated & can be easily modified
* Scalable solution for multiple nodes
* Self healing capability for Pods
* Chrome & Firefox versions can be easily updated from yaml
* Jenkins Cron job will take care of E2E process
* Debugging can be done with VNC Viewer using port-forward
* Disposable pods reduces load on VM
Anyone having basic knowledge on Selenium Grid & Jenkins can use this setup (kube.yaml) & can build complete setup from scratch.
Conclusion ->
I am ending here this as this blog carries enough detailed info to set up everything from scratch. Meanwhile, beginners will struggle with the following basic questions???
* How To Setup Docker & Kubernetes Cluster?
* How To Setup Jenkins Cron Job?
* Queries regarding Robot Framework Setup & Python Libraries?
* End To End Flow of Framework Architect?
* Debugging Failed Scripts?
* Grafana Setup For Monitoring Kubernetes Cluster?
All the above queries can be discussed & answered in future blogs. Please feel free to ask your thoughts, questions & feedback in comments.

Connect with me @ https://www.linkedin.com/in/rajprataprps/
